If you're read my previous article introducing the idea of microservices and discussing why NodeJS and Docker are ideal tools to implement microservices with, then you're probably hungry for some action!
The following instructions take you through the basic steps necessary to create your first NodeJS app and host it on Docker Cloud.
# 1. Setup
In 2016, setting up your local computer to create apps with NodeJS and Docker is easier than ever before. Simply...
- Install Docker (opens new window)
- Install NodeJS (opens new window)
- Create a Docker ID on Docker Hub (opens new window)
# 2. Create Your Microservice
For demonstration purposes, our first "microservice" will be a tiny NodeJS app tasked with the vital function of keeping track of our strategic beer reserve. Grab the app and run it:
git clone git@github.com:thinktandem/99beers-demo.git && cd 99beers-demo
npm install
node index.js
Now you can visit http://localhost in your favorite browser to access the app.
The Node app itself is pretty simple. We're using Express, which allows us an easy way to setup routing. Everytime another thirsty user makes a request to our app, they take another beer off the wall.
# 3. Add a Dockerfile
Running the app via Node on our local machine may be easy, but we need to guarantee that this mission-critical app runs the same way on every environment, from our laptop to a remote cloud server. To do that, we'll create a Docker container that runs our 99beers-demo app.
The Dockerfile included with the 99beers-demo app creates a simple, reusable structure:
FROM node:argon
# Create app directory
RUN mkdir -p /usr/src/app
WORKDIR /usr/src/app
# Install app dependencies
COPY package.json /usr/src/app/
RUN npm install
# Bundle app source
COPY . /usr/src/app
EXPOSE 80
CMD [ "node", "index.js" ]
The "FROM" keyword allows us to inherit all of the configuration from the official NodeJS docker image. This gives us all the tools we need in a tiny virtualized Linux environment.
Next we use NPM to install our dependencies and make sure our app codebase is copied into the correct working directory (WORKDIR).
Finally, we use the "EXPOSE" keyword to specify the port we want our container to expose its entrypoint on, and use the "CMD" keyword to define the action we want our container to perform when a request is made to it.
To see this all in action, you'll need to build the Docker image locally and run it. Remember to insert your Docker Hub username in the code below:
docker build -t [DOCKER_HUB_USERNAME]/99beers-demo .
docker run -p 8080:80 [DOCKER_HUB_USERNAME]/99beers-demo
Note the -p tag on the docker run command. This specifies the port mapping, linking port 80 on the container to be available on port 8080 on your local machine. To access the running docker app, you can visit http://localhost:8080.
# 4. Push to Docker Hub
Docker Hub is kind of like Github for Docker images. Deploying your Docker image to Docker Hub makes it available for other users to use or build off of. For example, the "node/argon" Docker image that we inherit in our Dockerfile is hosted on Docker Hub (opens new window).
In our case, we particularly want our Docker image on Docker Hub so we can use it in Docker Cloud. To push it to Docker Cloud, simply run the docker push command:
docker push [DOCKER_HUB_USERNAME]/99beers-demo
# 5. Create a Docker Cloud Node
Now we're set to get our app live on Docker Cloud! If you haven't already, associate a cloud provider with your Docker Cloud account by visiting the "Cloud Settings -> Cloud providers" section: 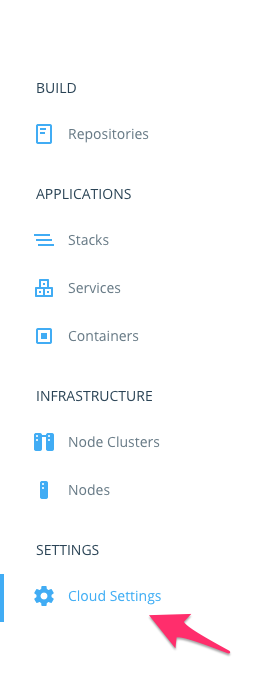
If you don't have a preferred provider, the Amazon Web Service's "free tier" (opens new window) (12 months of free service for a t2-micro server) is a convenient place to start.
Now you'll add a new "node" (a new server) to your configuration. Visit "Nodes" and select "Create". This should start up the Wizard. For right now, the defaults should be acceptable. The most important thing is selecting a t2-micro or lower server so you don't get charged for the service if you're using the AWS free tier. The following configuration settings should be servicable:
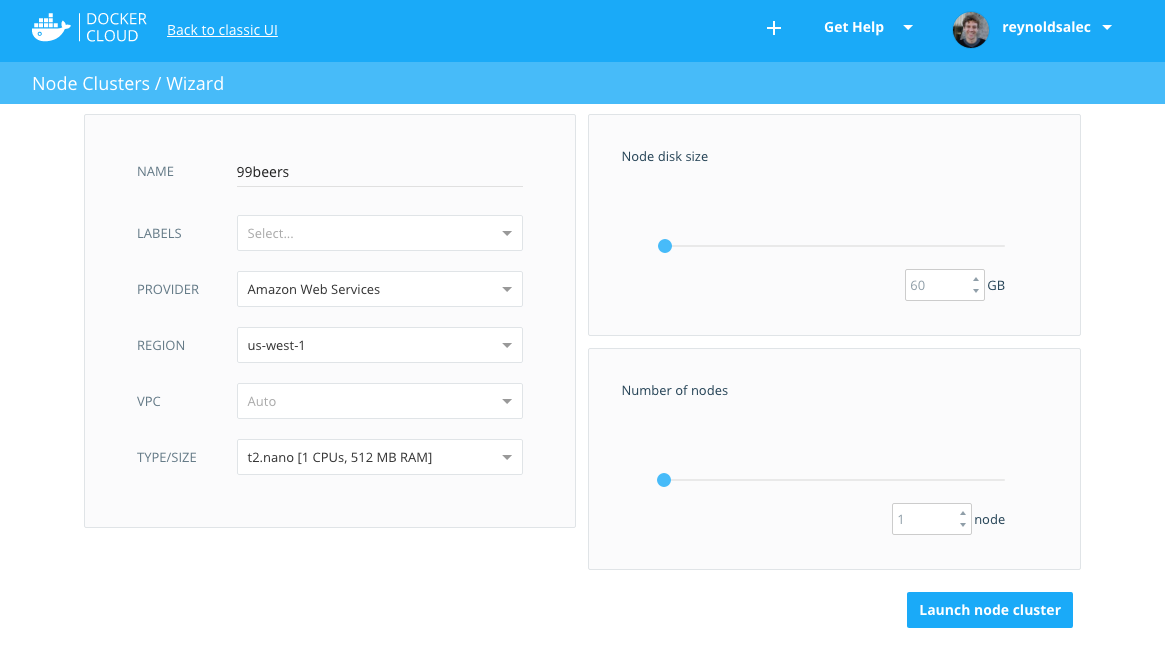
Docker Cloud Node Settings
Note that you could run multiple nodes and even group nodes from different regions into a single node cluster. This is one way you can scale capacity for your app, but obviously a method that isn't necessary for our example.
# 6. Create a Docker Service
To run Docker containers on our node, we'll create what Docker Cloud calls a "service". Navigate to "Applications -> Services" and click the "Create" button. In the first step, you'll need to select the Docker image you uploaded to Docker Hub. Click on the middle "globe" icon to search Docker Hub for your image:
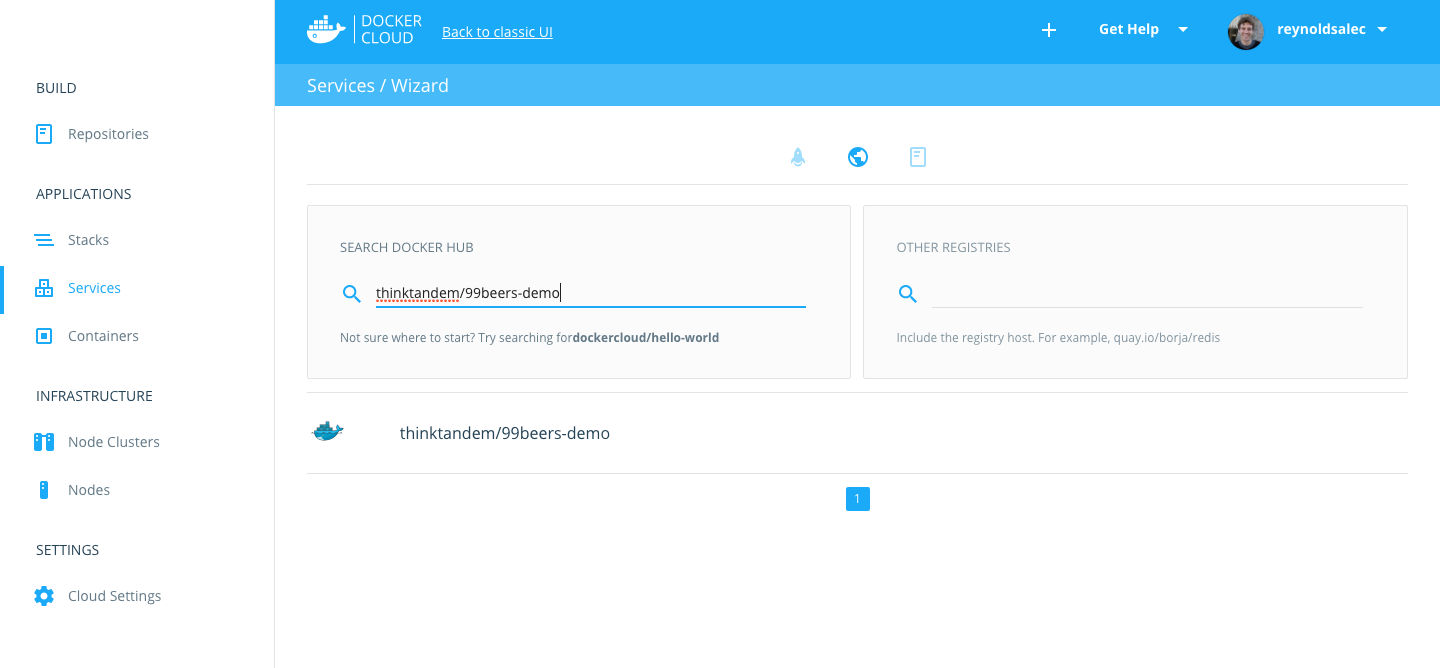
Search Docker Hub for your Image
Now you're presented with a page where you can designate the settings for your service. There are a lot of options, but don't panic! For our demo, there's only one thing you need to change. To expose our service to the outside world, go to the "Ports" section and publish the port to the world by click on "Published":
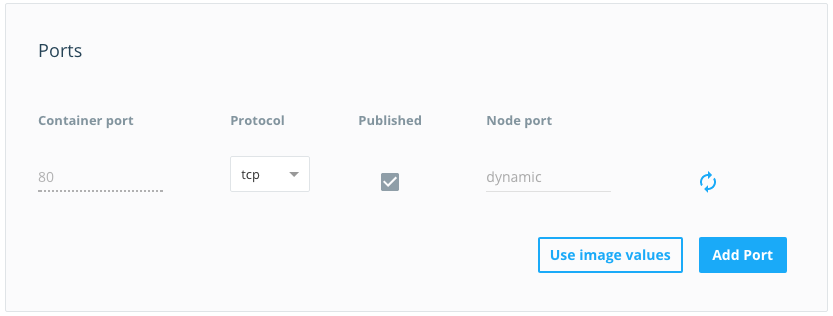
Publish a public port for your service.
In fact, this is the same as using the "-p" tag we utilized in our docker run command (docker run -p 8080:80 [DOCKER_HUB_USERNAME]/99beers-demo). We're mapping the container's exposed port to a port publicly available on the internet.
Click "Create & Deploy", and once your container is running (this should only take a few seconds...lightning fast, right?), looks for the "Endpoints" section on the page and click the link:

Visit your service online.
Boom! Your service is now publicly available online.
# 7. Basic Scaling on Docker Cloud
You may notice on this page that there's a slider at the top labeled "Scale":
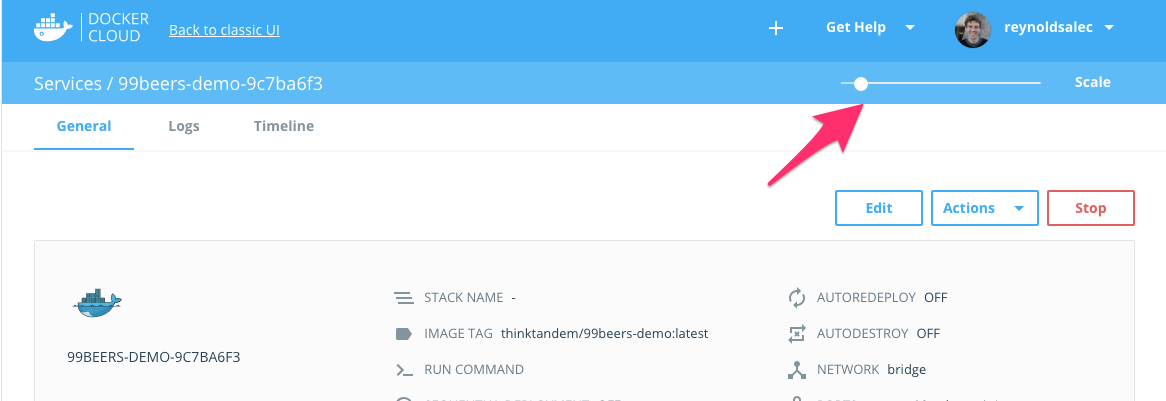
Scale the number of containers in your service.
This is one tool to help you scale the capacity of your application by adding more containers to respond to requests. Try dragging the slider to "3" and clicking on "Scale". You'll notice that two more links appear in the "Endpoints" section:
Congratulations, you've just created two more containers with a click!
However, our victory is somewhat hollow. Since these are three separate containers, all we can't do much more than visit each individual container on its own URL. This doesn't do anything to scale our application.
To handle more traffic, we need to create a proxy service that will route requests to this pool of containers. Go back to the main "Services" page and click "Create" once more. This time we'll use the pre-made haproxy image suggested by Docker Cloud on the first page:
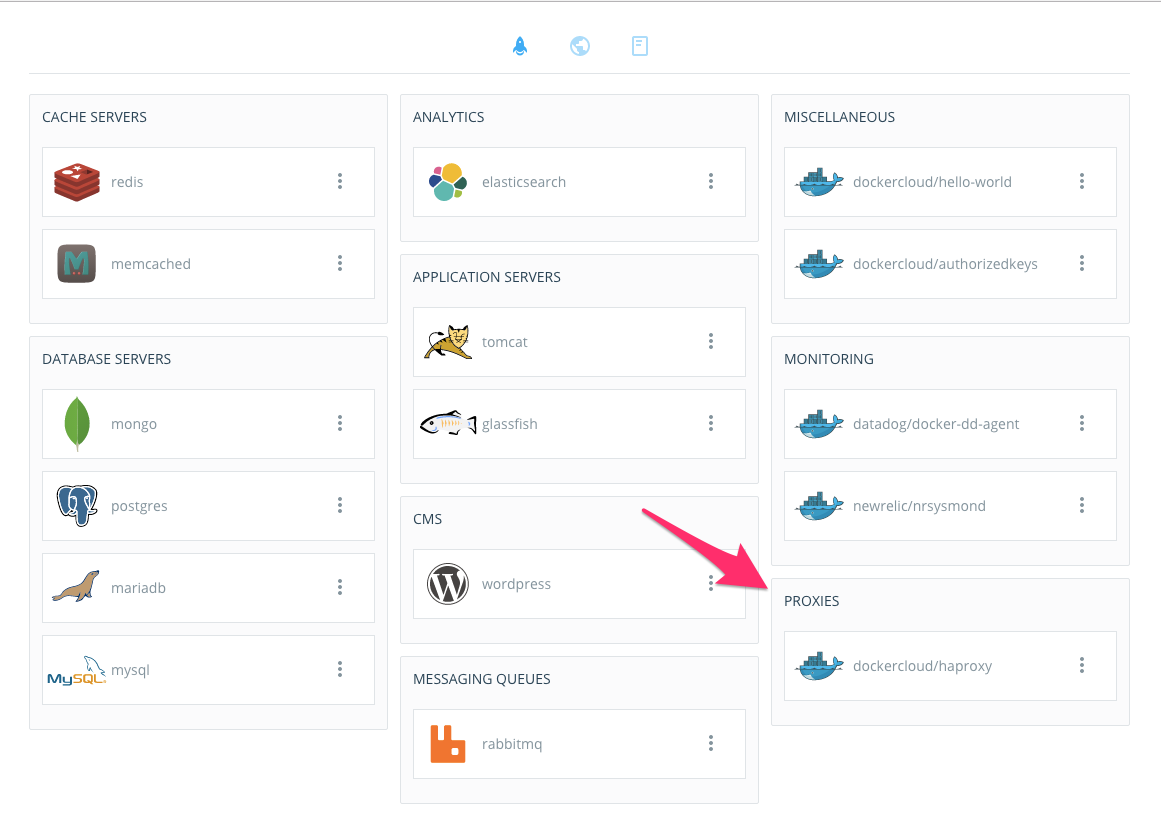
Select haproxy image.
Like our 99beer-demo service, we want to publish the haproxy server to the world, but because it will be the main entrypoint to our application, we'll explicitly publish it as port 80 so we don't have to specify a port when visiting it:
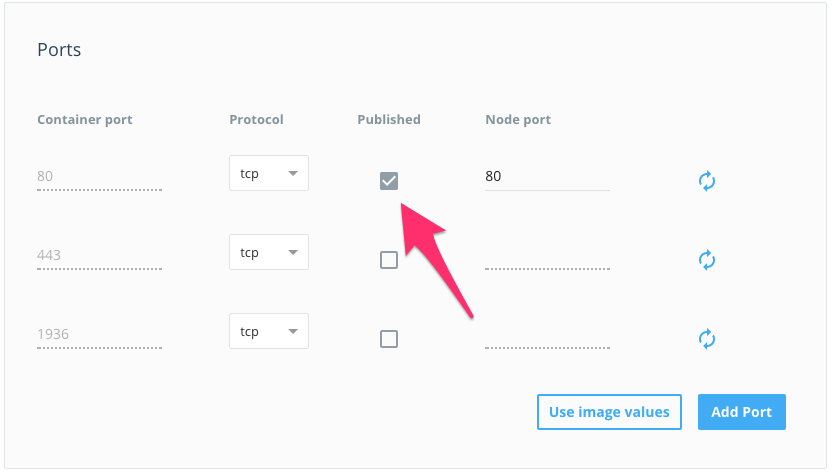
Select haproxy port.
Finally, we'll create a "Link" from our haproxy service to our 99beers-demo service:
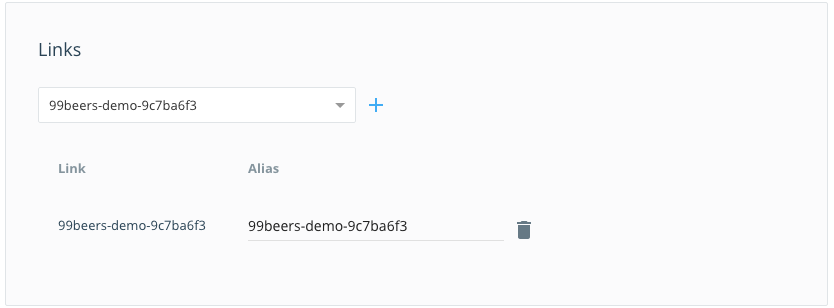
Select haproxy link.
Once our haproxy service has started, visit it's URL. It should now route you to whatever 99beer-demo app container is available.
# Next Steps
One thing you'll quickly notice about this is that we're (somewhat) randomly accessing all three containers. Clearly if we want our application to be the canonical, definitive resource on how many beers we have left, we'll need to refactor it so our different containers can keep a unified count.
We'll explore that topic in our next post, when we start discussing more advanced networking of Docker containers, ways you can integrate persistent file systems and stores of data, and some more ways we can scale our app. However, what we've just shown you is enough to make a "static" Express app that can be scaled very easily and quickly. We run a few simple sites this very way!
